Setting Up Weblogic SSL
Setting up SSL under Fusion Middleware and Weblogic
When setting up SSL under Oracle Fusion Middleware and Weblogic, you will need to have the certificates in a couple different formats, depending on what you are running.
If you are running Webforms (for example, using Banner INB) and or the Web toolkit (for example, using Banner SSB) then you will need to have the SSL information in an Oracle Wallet.
Generate the wallet using Oracle Wallet Manager, (owm). Remember that this app requires an X Server on Unix/Linux Platforms. Also remember that the COMMON NAME is your hostname (e.g. www.nyquest.com) AND that you should use a 2048 keysize these days. Once you enter all information, you will generate a certificate request which needs to be processed by a Certificate Authority (CA). Once it's signed you will import this back into the certificate along with the Root CAs. At that point you should be set. Make sure to click the "Auto-Login" checkbox and you should be ready to go.
To enable SSL under Webforms, edit the file "$MW_HOME/asinst_1/config/OHS/ohs1/ssl.conf" locate the line SSLWallet and edit that line to point to the DIRECTORY containing the wallet file. DO NOT include the actually wallet filename which always should be ewallet.pl2. Once you edited the file, restart OHS services with the following command:
$MW_HOME/asinst_1/bin/opmnctl stop
and then
$MW_HOME/asinst_1/bin/opmnctl start.
By default SSL should be running on port 8890 for both webforms and toolkit.
In order the setup SSL under Weblogic (which is required for Banner XE), you need to convert all SSL certificate information into a Java Keystore (JKS)
Personally I find it's easier to start with a wallet (which can be created in owm) and then just convert it to the other formats which I will need. This tutorial will assume you will convert a wallet into a keystore for use in weblogic.
You can convert a Wallet to a JKS file using the orapki command. In the example below the command converts a wallet file names mywallet to a keystore named mykeystore.jks
orapki wallet pkcs12_to_jks -wallet mywallet -pwd mypasswd -jksKeyStoreLoc mykeystore.jks -jksKeyStorepwd mypasswd2The conversion will take all root certs in addtion to the private key from the wallet into the keystore. Your private key will have an alias of "orakey". You will need to this later on.
At any time you can view the contents of the keystore using the following command:
keytool -list -keystore [path_to_keystore]
Once you are all set upload the keystore file to the weblogic server. Make sure it's readable by the "oracle" user. Then login to the weblogic console admin page at:
http://yourserver.com:7001/console
Click the Environment->Servers->[Your Managed Server]
Under General, make sure "SSL Listen Port Enabled" is checked and that "SSL Listen Port" is defined. It is usually defined as the next free port number from the non-SSL port (e.g. if non-secure is 7001, then secure would be 7002)
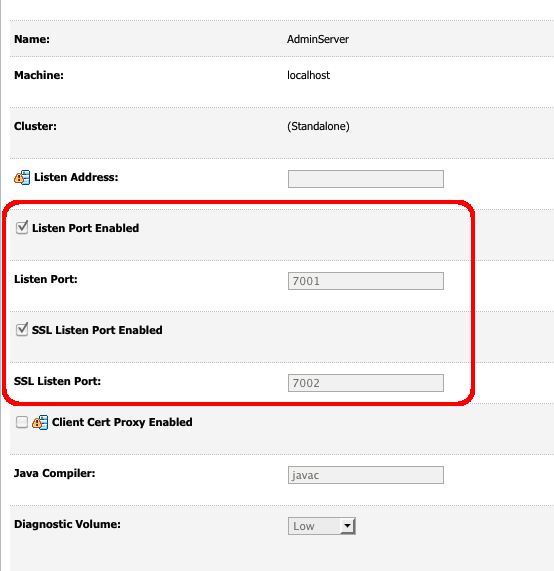
Click save, then apply changes.
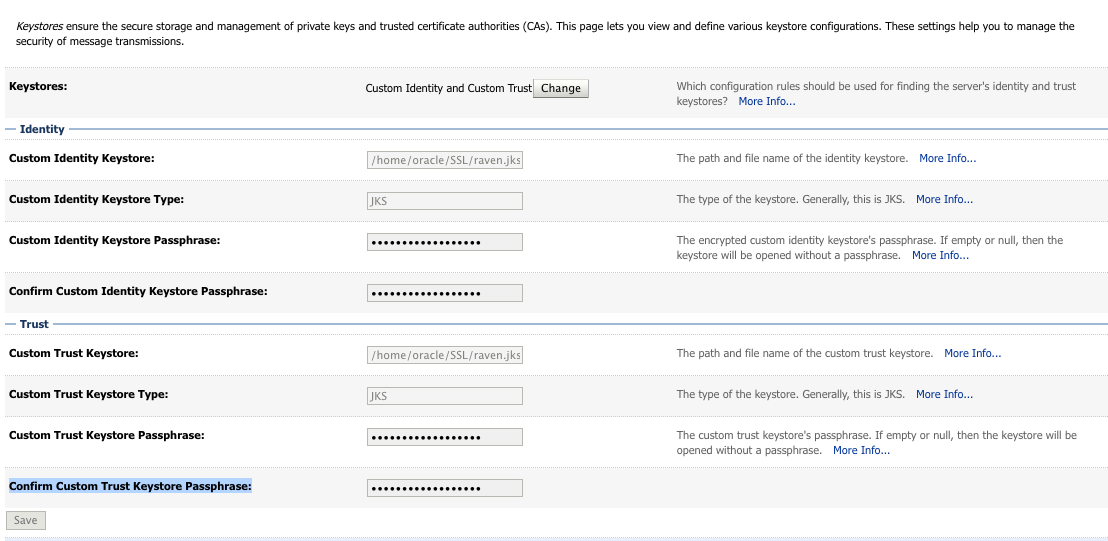
Then Click on the Keystores Tab
Keystores: -> "Custom Identity and Custom Trust"
Custom Identity Keystore: -> [FULL Path to the keystore file on the server]
Custom Identity Keystore Type: -> JKS
Custom Identity Keystore Passphrase: [Value you set for the keystore above]
Confirm Custom Identity Keystore Passphrase: [Value you set for the keystore above]
----
Custom Trust Keystore: [FULL Path to the keystore file on the server]
Custom Trust Keystore Type: JKS
Custom Trust Keystore Passphrase: [Value you set for the keystore above]
Confirm Custom Trust Keystore Passphrase: [Value you set for the keystore above]
Click Save, then apply changes
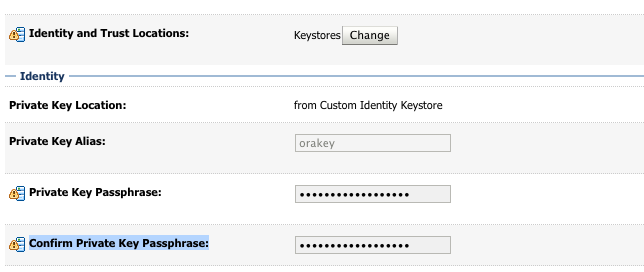
Click on the SSL tab:
Private Key Alias: orakey
Private Key Passphrase: [Value you set for the keystore above]
Confirm Private Key Passphrase: [Value you set for the keystore above]
At this point, you should be all done. Restart the managed server and you should be able to connect to the SSL port.